|
Paramotoring Articles:
Why Paramotoring?Power to the Thermals Propeller Truth Crossing Over PPG Buyer's Guide Piloting Considerations The Benefits of AVgas More Articles & Tips
|

A Buyer's Guide to
Choosing a PPG Motor
By Chad Bastian and Lee Anne Norris
 People looking to get into PPG invariably ask the question, “What is the best powered paragliding motor?” The truth is that there is no one best unit for everyone. What you want and what you need, for how and where you want to fly, is an individual choice. In the end, you alone are uniquely qualified to select the best paramotor for you.
Still, deciding among the array of options can be a daunting task, especially for someone with little or no previous experience with paramotors. The extensive list of features and accessories currently available to the market will make you think Christmas has arrived early. However, no single motor has every feature and not many pilots could afford a motor that did, so there are choices to be made.
Here are a few of the options that you should consider. There are undoubtedly more that we did not yet consider. Take the time to rate their importance to you in relation to each other and to the motor as a whole.
Support
Look for a motor that will have a high level of support and a ready supply of parts. Like any motor, it's not a matter of */If/* it, but */When/* it will fail. The motor will need routine maintenance and periodic replacement parts and repairs. Choosing a well established, name brand motor with a manufacturer and dealer that you can rely on will help keep your motor running smoothly. Ask others what support they have and haven’t received from their dealer and manufacturer.
Buying locally from your PPG instructor can be a great way to ensure support. Most full-time schools offer several brands of motors; are a great resource for information; and will be there to support you and advise you when you need it.
We’ve found that one subtle clue to the true level of support you can expect from a manufacturer is the Owner's Manual. Unless you are a mechanical whiz, you will want a good manual to help you make adjustments, perform maintenance and guide you through minor repairs to your unit. Look for details and pictures. If the manufacturer took the time to prepare a thorough manual, it’s an indication that they really care about how their customer interacts with their motors.
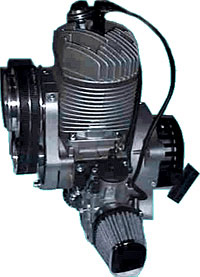
Thrust and Power Versus Motor Weight
The amount of thrust you need is related to your body weight and the altitude at which you are launching. More power is generally, but not always, found in a heavier motor.
Purchase a motor that is suitable for your size. If you are comfortable evaluating technical data to determine the amount of thrust you can really expect, spend some time looking at the engine type and size; the max. rpm; the max. horsepower; whether there is a tuned exhaust; the reduction ratio used; and the propeller’s diameter, pitch and the number of blades. But numbers don’t always tell the whole picture; so still ask lots of questions, preferably of pilots that fly the motor you are considering.
If you are like most new motor pilots and unsure of how all that data works together to develop thrust, there is a more basic method of determining what size of motor is best for you. Most motor companies now list a recommended maximum weight range for their motors. Keep in mind that this does not normally take into account the altitude that you will be flying at. A good rule of thumb is to add 5 lbs to your body weight for every 1,000 feet of altitude that your launch is above sea level. For example a 150 lb pilot, launching at an altitude of 5,000 feet above sea level should add 25 lbs to their body weight. In effect they should look for a motor that will have enough thrust for at least a 175 lb person.
Once you think you have found the perfect motor size for you, ask more questions. It is important to keep in mind that there can be a difference between actual tested thrust and the advertised thrust. In an effort to make their numbers look their best, a manufacturer may change out props or make some other adjustments to increase the thrust capabilities that they advertise. However, these adjustments aren’t made to the base units that are sold and the resulting thrust and power is lower than what was advertised. To avoid falling into this trap, talk to pilots that are already flying the motor you are interested in. Ask questions about their weight and the altitude they fly at. Gather their impressions of the amount of power they have at their disposal and whether it is appropriate for their needs, keeping in mind that a more skilled pilot can launch more easily with less power.
 Your goal is to purchase a motor that has enough thrust to allow you to easily launch when winds are light or nonexistent. Too little power will leave you running long and hard, exhausted after each launch attempt. After you launch, there should also be enough power to allow for a good steady climb rate. This becomes important if you ever need to clear unexpected obstacles. You will also need enough power to maintain level flight when you have accelerated your glider with trim tabs or a speed bar.
Be careful not to be caught by the “more is always better” mindset. More power usually means more weight and bulk, making the motor difficult to launch. Too much power can actually be dangerous. Overpowering can cause a stall, or even twist the pilot up in the risers, facing them the wrong way, with little control over the glider! Larger, more powerful motors also produce a lot of torque, making the 'torque turn' while climbing even more pronounced. Too much power will at the very least, result in more blown launches and many expensive repairs to the motor.
(On a side note, some newer pilots, presumably “planning ahead” may be tempted to get a very large motor, with the eventuality in mind that they would like to take others tandem. This can be a tempting plan, but a very bad idea for several reasons. First, it will take most pilots years to earn the required FAA exemption to fly tandem and flying tandem without this exemption puts our entire sport in danger of being shut down by the FAA. If you try to learn how to fly solo on a tandem size motor, the size, weight and amount of power emitted will definitely put you in range of the dangers listed in the paragraph above. Further, your learning progress will be slower and repairs to the motor alone (hopefully not to yourself) could easily cost as much as buying a larger motor when you are ready for it. Stay safe and save money, get a motor that is the right size for you where you are now.)
Tuned Exhaust System
A tuned pipe will cut engine noise. A fully Resonant Tuned Exhaust Pipe will also harness extra energy from a smaller motor, producing more horse power and increasing the torque peak. Ideally this is done without increasing the top RPM, but still increasing the torque across the range resulting in smoother more controlled power, with extra thrust.
Propeller
Wood propellers are inexpensive, but usually slightly heavier and almost always noisier than the hollow composite props. Hollow composite propellers are often lighter, better balanced and generally quieter than wood, but they are also considerably more expensive. Solid composite props can be the heaviest of all, but are still better balanced than wood.
Other propeller considerations are centered on safety. In our experience, a wooden prop or a hollow composite prop will cause less damage than a solid composite prop if it hits the cage or another object.
Some pilots go through as many as a dozen props in their first year, although with good instruction this can be avoided. Many times a wooden propeller, if it is not too badly damaged, can be repaired by an expert. Keeping all this in mind, it may be good to start out with a wooden propeller, then convert to the more efficient composite prop once you have fine tuned your skills.
Carburetors
Some motors have a slide/float bowl type of carburetor, using gravity to supply the fuel. Others have active fuel pumps that bring the fuel up from tanks mounted below the motor. Still others have a diaphragm type carburetor. The gravity fed fuel systems tend to flood and kill the engine when doing spiral dives or other aerobatic maneuvers, necessitating a restart or landing. However, for those pilots just cruising around and not doing steep turns, these gravity fed carburetors are fine.
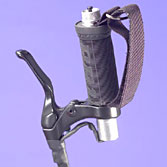 Throttle
Hold the throttle in your hand and make sure it fits comfortably. Some handles are just not the right size for your hand. You want a throttle that is large enough to easily hold, but small enough to control with just a finger.
Right or left handed throttle? Deployed reserves have been known to open and save pilots from serious injury in as little as 200 feet above ground level (agl). Not surprisingly, we advocate always flying with a reserve. Are you left or right handed? Consider choosing a throttle that will be operated by your non-dominant hand, leaving your dominant hand free for emergencies. Some manufacturers have a very long throttle cable that will not interfere with a reserve toss. Try sitting in a simulator and throwing a dummy reserve. If the cable is not long enough to allow you to complete a fully extended reserve toss while holding the throttle, you will need your dominant hand free to perform this action. Many, but not all motors will allow you to switch the throttle to either hand, so this can be a great option as well.
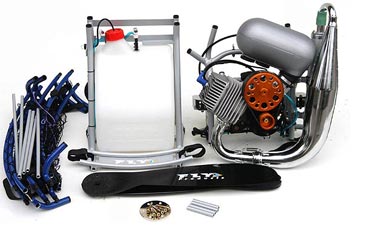
Cage
Consider how you will be transporting your motor. Will you need to break your unit down to put it into the trunk of your Toyota Echo, or do you have a truck you can throw the fully assembled unit into the back of? It's certainly a lot easier to get airborne faster if you do not have to set your motor up each time you fly. On the other hand, if you want to travel via the airlines with your motor unit, you are going to want a motor that is easy to breakdown to a very compact size and then quickly reassemble when you are ready to fly.
Hard or soft, cages can be simple or difficult to assemble. Ask for a demonstration; better yet, try it yourself!
Soft cages use a 'tent pole' design, with soft netting between the struts. Soft cages won’t protect the prop from hitting the ground if you turtle (end up on your back, laying on your cage). Some hard cages are all one piece, making it expensive to replace. Other hard cages break apart into two, three, four or more pieces that will pack into a small case. Some designs even feature identical piece segments so, in case of damage, you can easily replace a single section of the cage.
Look at both the size of the holes in the netting and the how flexible the netting is to make certain you cannot reach a hand through the net and into the prop.
Finally, when evaluating the cage, look at the assembled cage’s edge in relation to the prop. If you turtle consider whether the cage will extend far enough beyond the prop that the prop will not be able to strike the ground or the cage.
 Frame Materials
Steel, aluminum, titanium - which is best? When comparing identical tubes (wall thickness, diameter and length) of steel and titanium they would be about equal in strength, but the titanium tube would only weigh half as much as the steel. If you compared identical tubes (wall thickness, diameter and length) of aluminum and steel, the aluminum would be roughly half as strong as the steel, but only 1/3 the weight.
In the real world it’s not as easy as all that. Designers can choose different diameters and wall thickness to get the strength to weight ratio they are looking for. So it will be up to you to examine the true durability of each cage you examine, not only in regards to the type of material used, but also considering the wall thickness and diameter.
Put more simply, steel frames are strong, but quite heavy; some units with steel frames weigh over 100 lbs when you add the gas to the tank! Aluminum frames are lighter than steel, but make certain that the frame is made with sufficiently thick tubing and aircraft welds, or it may crack apart. You may also want to ask what type of aluminum is used in the frame. T6-6061 aircraft grade aluminum is a high-grade aluminum and has a higher strength to weight ratio than the more common T8-6068 or industrial grade. Titanium frames can be very light and very strong but that will depend on the thickness of the tubing, and the thicker the tubing, the more expensive the price of the motor is likely to be.
Pull Start and Electric Start
Most manufacturers say that their motors are easy to start while flying, with added features like 'finger touch starting' and 'high-energy ignition', but the truth rests with actually trying to start the motor while in flight. Some are actually very easy, while others are virtually impossible. Discover how easy it will be by trying it out in a simulator.
If you are going to thermal with your motor you may want to shut it down during long glides. In this scenario, you will want to consider an electric start to ease the process of repeatedly restarting your motor in the air. The downside of an electric start is the additional weight.
Gas Tank
Depending on your goals in powered paragliding, you will want to look at the capacity of the fuel tank. Some tanks are large, but the motor may also use fuel more quickly, so look at the expected run time to make your choice. Also keep in mind that gas weighs about six pounds per gallon, so the more gas your tank holds, the more weight you’ll be launching with when it’s full. It can be advantageous to have a see through tank and a mirror so you can check your fuel level while you are flying. Another useful feature is an easily removable gas tank, so you can remove the tank when you are transporting or storing the motor in a place where the fumes would be bothersome.
Comfort
This is perhaps one of the easiest qualities of the prospective paramotor to investigate and it is very much an individual decision. Try on as many paramotors on as you can. Pick the motor up off the ground and transition to a standing position with it on your back. How easy is it to make the transition? How comfortable are you standing and walking with the unit? Make certain you also spend some time sitting in a simulator with the motor. If it becomes uncomfortable in the simulator, you can bet you aren’t going to like taking long flights on it.
 Attachment Point
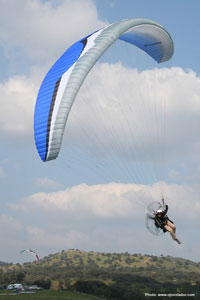
The attachment point is where the wing's risers attach to the harness. They can be placed at high, medium or low attachment points. Each placement has its own pros and cons.
High Attachment Points - On some units, the risers attach well above your shoulders, at a very high point. This makes for a very stable flying position that will react more benignly to mild turbulence. However, it also makes it a bit difficult to inflate and kite the wing prior to takeoff. This position raises the brakes to such a high point that lengthening the brake toggles is often necessary. If you plan on using the glider for free flight as well, lengthening the brakes will put them too low for paragliding. High attachment points also make it virtually impossible to seat steer the glider using weight shift input. You are likely to also notice a loss in your range of vision when the attachment points are placed high.
Medium Attachment Points – These are usually found right at shoulder height. This position drops the brakes to a more reasonable level (still a bit too high for free flight) and makes for far easier inflation's and kiting control. It also allows for a bit more seat steering with a smaller loss in stability and visual range.
Low Attachment - This attachment point is rare, but one that might feel the most comfortable to PG pilots crossing over to PPG, as it allows the greatest amount of seat steering through weight shift. This position also naturally places the brakes at a comfortable height. However, this attachment point also results in the least stability of all three attachment point options.
Weight-Shift Bars
The inability of basic motor units to allow weight-shift control of the paraglider has resulted in some ingenious devices to bring seat steering to PPG's.
Some motors have horizontally movable arms where the harness attaches to the unit, which do very little to allow weight-shift control, but can dampen oscillations during landing.
Another design has vertically movable arms where the risers attach, giving a limited ability to weight-shift, but such movement is still very stiff.
The most effective design for weight shift steering is the free floating "J" bar design where the motor is basically suspended behind the pilot with a tandem spreader-bar type of arrangement. The pilot is completely separate from the motor, allowing them to shift their weight from side to side. Even while climbing, the pilot is able to lean away from the torque turn and fly straight with no brake applied. In some units the J-bars rest on the shoulders until the wing is inflated. This arrangement will feel a little unusual and may take some time to get used to. The drawback of this design is that it somewhat limits peripheral vision.
 Looks
Looks
Let's face it – Sexy sells. Of course we all want the sexiest, sleekest, most visually attractive motor available. Still, remember that there are some plain looking units that purr through the air and there are some really hot looking motors that run like lemons. Unless your only goal is to look good while you stand next to your motor, take the time to delve behind the looks and make sure the motor has what it takes to keep you flying.
Cost
This is at the bottom of our list of considerations, because it should be the very last thing you consider when buying a motor. If you have spent time thinking about what you really need and what you’d really like, then your price range has probably been defined for you. There’s nothing wrong with looking for a bargain, but make sure you understand why a motor is value priced and decide whether you can live with those reasons. Trying to save 10 - 20%, but skimping on quality or what you need, is not a bargain and may end up costing you a lot more in the long run. On the other hand, don’t assume that an expensive motor is the best one on the market. We’ve met a few manufacturers whose egos were the only thing that set the price tag.
You may want to consider purchasing a used motor to save money. Be very particular when considering this option. A used motor that has experienced a hard landing may have hidden damage that is irreparable and will always make flying it difficult or even dangerous. Also remember that when purchasing used, the dealer and manufacturer have no obligation to provide any service under warranty. This doesn’t mean that they won’t, it just means that they do not have the obligation to do so. Consider asking the seller to provide a dealer inspection before you purchase the unit.
Make Your Shopping List
Once you’ve taken the time to go through each of these options, you should have a good idea of what you want and don’t want in a motor. Then take your shopping list to a trusted instructor. A PPG instructor that is certified by the USPPA, ASC or the USUA that is willing to answer your questions patiently and knowledgeably is your greatest resource in narrowing down your motor search. Finally, ask pilots that are flying the units you are interested in, what their impressions are. What would they change? Knowing what they know now, would they buy the same motor again? You will probably discover options you hadn’t even considered yet.
Chad Bastian is the owner/operator of www.TrikeBuggy.com, www.AmericanParagliding.com and www.Miniplane-USA.com and former owner of Fly Above All. The flight school was established in 1980 and has expanded from its roots in hang gliding to become one of the largest free flight and motoring schools in the country – and has trained thousands of pilots. Chad has been flying for well over a decade and has been a member of the US Paragliding Team. He is a Basic Flight Instructor and Tandem Instructor for the ASC, a Certified Instructor and Instructor Administrator for the USPPA and a Master Rated Pilot, an Advanced Instructor, Observer, Tow Administrator and Advanced Tandem Instructor for the USHGA. We invite you to visit our website or contact us for more information about paragliding and paramotoring.